Sunday, March 30, 2008
ATC workshop ... Lesson 8
I am getting caught up! ... here is lesson 8! The first one is No Sew Fabric. First transfer an image to fabric with carbon paper. Then retrace the lines with a fabric marker and color with pastels. Heat set the color and then use a little fabric fuse to attach it to a piece of felt. Then you just trim it to size. The second one is Fused Fibers. Cover your cardstock with some fusible webbing then start laying on fibers. Sprinkle with embossing powder here and there and then iron between Teflon sheets. I thought mine looked like a landscape so I added a couple little black fibers to emulate birds.
Wednesday, March 26, 2008
Serenity
My first real canvas… I have done a couple of tiny ones but this one is 8x8. I used my grandmother’s buttons and little purse. I hated to glue it but then I thought I was preserving it and that it would be where I could enjoy it too. I used the fresco technique from ATC lesson 7 and then my spackle technique too.
Monday, March 24, 2008
He Won!

Woooowhoooo! and
I want to thank everyone who voted for him :)
My son is a graphic artist and has entered a contest for the t-shirt design for the next Dukes Fest. It is important to him so it is important to me. Please help him win by taking a moment to vote for his shirt. To vote for his please choose 11. Thank you so much! I am ever so grateful!
You can visit his website too Bugsy's Junkers
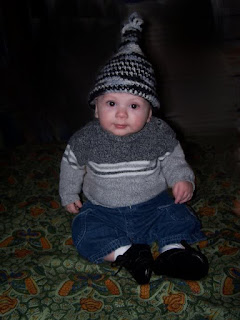
Quinton .. the cutest ever!
It has been a while since I have posted a picture of the cutest grandbaby ever! Doesn't he look like a little gnome in that hat his mommy made him!
Saturday, March 22, 2008
ATC workshop ... Lesson 7
As promised …. Lesson 7!
The first one is a resin fresco. I started with a harvest gold cardstock and then dabbed embossing ink here and there. Then sprinkled it with ultra thick embossing powder. Then it was dry brushed with gesso here and there too. Once that was dry, I painted it with a wine acrylic paint and then with a pink metallic. It was then stamped and the edges trimmed with a black permanent marker and then again with a gold paint pen. The little embellishment was made by mixing ultra thick embossing powder with a little of the wine acrylic in a bottle cap. Then I heated the bottom of the cap with my heat gun. When it was melted I stuck a stamp that had been coated with a blue metallic pigment ink into the melted stuff. When it was cool I just peeled off the stamp.
The second one is called glass like resin. I used white cardstock and dry brushed vertically with a teal paint and then dry brushed horizontal with pink. When that was dry the entire cardstock was covered with embossing ink and sprinkled with ultra thick embossing powder. While it was hot I kept sprinkling more and more ultra thick embossing until I had a deep finish. While that was still soft, it was stamped with the swirl and the little saying. Then I used a gold paint pen on the edges and some little fairies that I had cut out of my collage sheets.
The second one is called glass like resin. I used white cardstock and dry brushed vertically with a teal paint and then dry brushed horizontal with pink. When that was dry the entire cardstock was covered with embossing ink and sprinkled with ultra thick embossing powder. While it was hot I kept sprinkling more and more ultra thick embossing until I had a deep finish. While that was still soft, it was stamped with the swirl and the little saying. Then I used a gold paint pen on the edges and some little fairies that I had cut out of my collage sheets.
The third one I think is my favorite. It is called dimensional resin. First a sheet of mica is cut the same size as an ATC. Then metal tape is used to form walls around the edges so the resin wont run off. If you have ever made a little pan out of foil it is much like that. Then I molded a raindrop in a resin mold using melted ultra thick embossing, stirring in some blue Judikins roxs with a skewer. Then I filled the mica “pan” about half way with the same resin. I sat the whole thing on a electric fry pan to keep it liquid while I worked. Then I added foil flakes at the bottom and added the embellishments. The spider web is a Dresden foil and the little face is a metal bead. Then I finished filling the little “pan” with melted ultra thick embossing and dropped my pre-molded raindrop in. When it was cooled, the metal tape was removed. Then I stamped my newsprint stamp on the back. The words look backwards from the front but they are so small you really don’t read them anyway…at least not through the resin.
Friday, March 21, 2008
ATC workshop ... Lesson 6
I know you all thought I just disappeared, and I feel awful that I am so far behind but it was unavoidable. I am going to try and get caught up, I guess it is better late than never :)) The first card on this lesson is emboss-resist. You paint a card with acrylic paint. You can use one or two colors. I used two colors … sienna and gold. Then it is embossed with clear embossing. I used my new gate stamp. Then it was dry brushed with black. I really love the technique. The second one is embossed scraps. I had some scanned money left over from another project so I tore it into several pieces. Then it is glued to the card with an excess of glue. Once the card is covered and before the glue dries, it is sprinkled with embossing powder and heat gunned, I used green glitz. There was just two for this lesson but I hope to post lesson 7 tomorrow.
Mystery Swap
This is just a little card I made for my mystery swapper. It is time for the end of this round and the reveal so I thought I could post it :)
Sunday, March 16, 2008
Subscribe to:
Posts (Atom)


